Tuesday, December 23, 2014

Betsy Challenge 15: Sacred or Profane

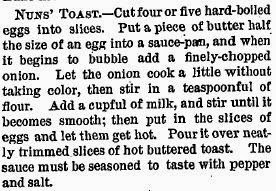
It was sheer luck that caused me to stumble across the recipe for this challenge. I was scratching my head trying to think of any sort of recipe I could do for this, and had nearly settled on devil's food cake, when I stumble across this recipe in A Prairie Kitchen by Rae Katherine Eighmey:


Well that sounded promising! In previous challenges, we discovered the importance of checking one's sources, so I went to the Illinois Digital Newspaper Collection and found the corresponding edition of The Prairie Farmer. There it was!:


The Challenge: Sacred or Profane

The Recipe: Nun's Toast, from The Prairie Farmer

Year/Date and Location: 1883, Midwest

How Did You Make It: Just exactly as directed.The Gentleman Friend helped as I got distracted by a phone call in the midst of it, and then had Issues with the roux.

Time To Complete: Probably half an hour? See aforementioned distraction.

Total Cost: Under $5

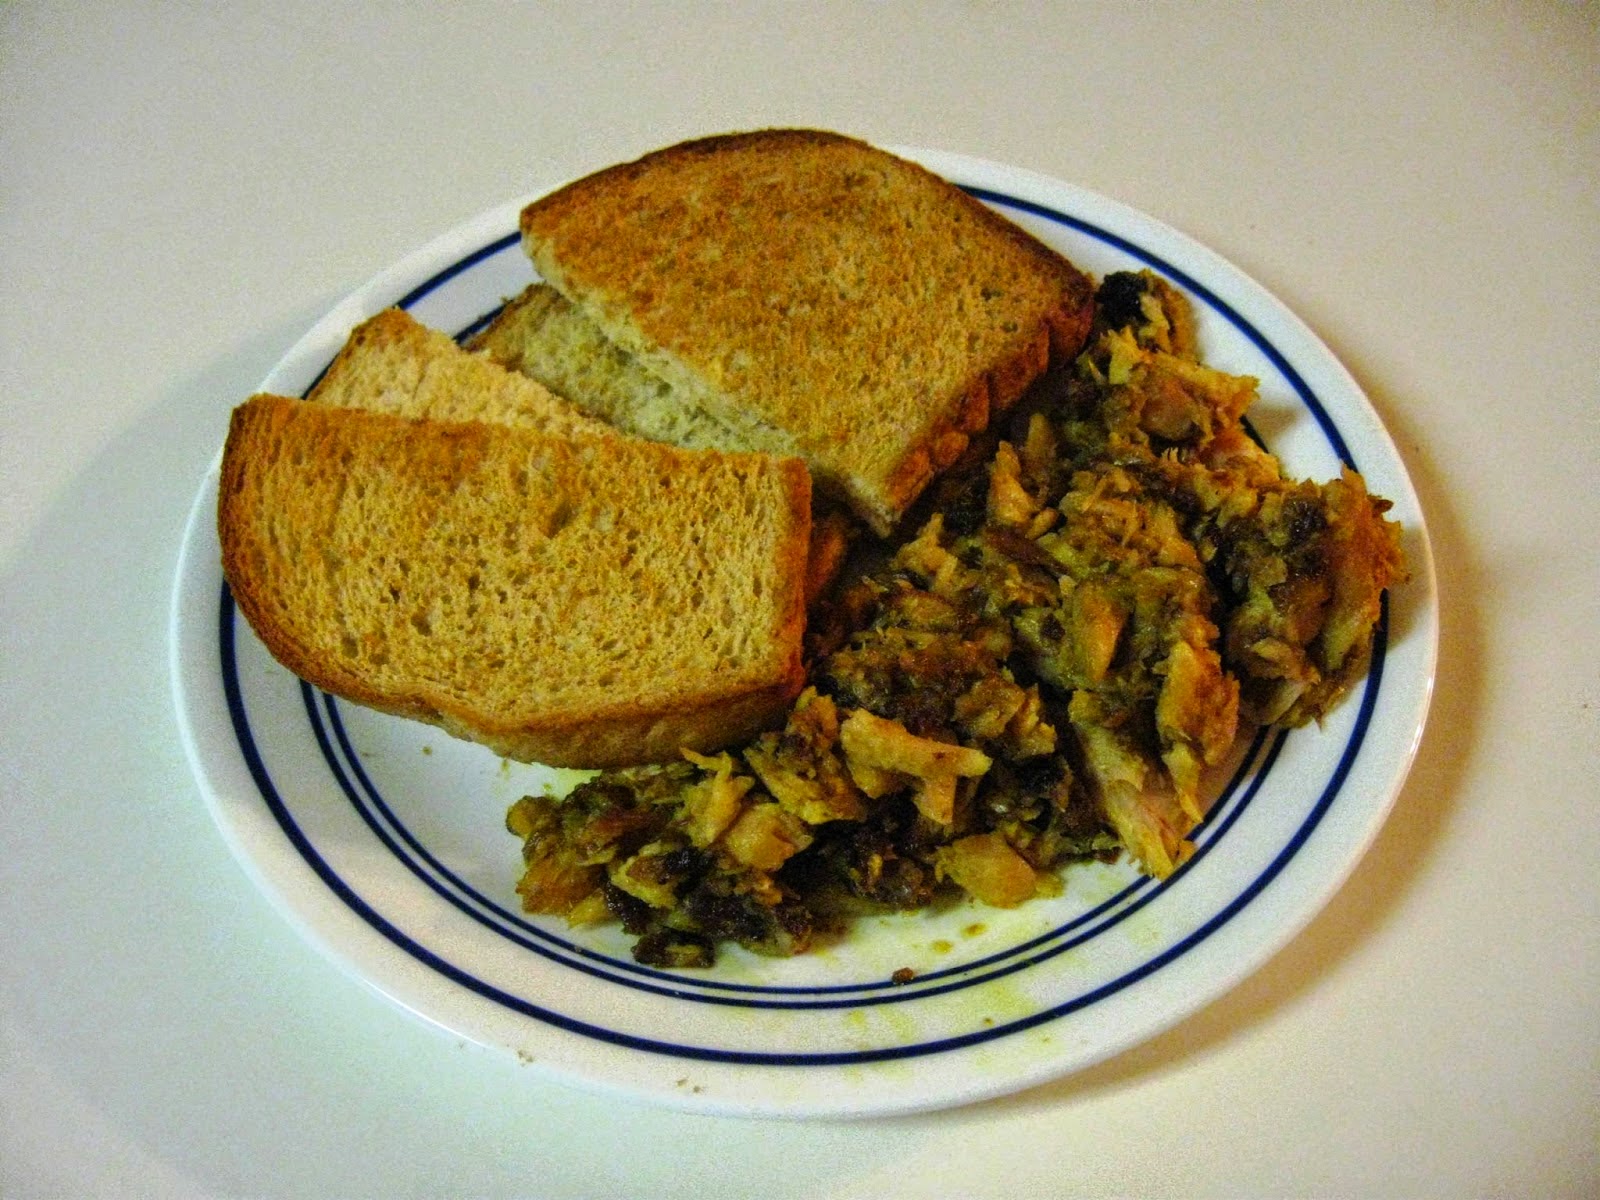
How Successful Was It?: Well it's pretty much exactly what you would imagine eggs in a bechamel sauce to be like. I was surprised at how tasty it was! I'm not a huge fan of eggs but I can definitely see the appeal - this is a meal that would stick to your ribs, can be made very cheaply, and would probably be pretty good with some sausage or ham on the side. Gentleman Friend gave it a good review.

How Accurate Is It?: I did not use heirloom ingredients and I cooked it on an electric stove. Beyond that, I followed the directions closely.


Sunday, December 21, 2014

Melissa Challenge 14: Fear Factor

Here I am!  Finally back and posting on the blog!  For those of you who do not know, I am finishing my last year of undergraduate studies, and cooking/baking in my apartment during my busy week is near impossible.  Most of the historic cooking I have been doing has been in the hearth kitchen at Historic Locust Grove, which is amazing and fun and awesome, but I barely have any pictures of that and the recipes I make there don't necessarily line up with what the challenges are.  However, I did realize that I was going to be remaking a recipe I made for the recent Christmastide event, which is definitely feared or revered by most...

Fruitcake!

Specifically, a pound plumb cake from The Housekeeper’s Instructor,  by William Augustus Henderson, 1809


To be honest, I did not hold fast to this recipe.  What I made ended up being an amalgam of a few pound cake recipes I have made.  My tried-and-true recipe follows:

1 pound butter
1 pound sugar
1 pound eggs (about 9 large eggs)
1 whole nutmeg grated, or 1 tbsp ground nutmeg
The zest of 1 lemon
1 gill (4 oz) of brandy or cognac
1 pound flour
1/3 pound currants
1/3 pound candied orange peel
1/3 pound candied lemon peel

Preheat your oven to 350.  Start by creaming your butter and sugar together:

Next, add your eggs.  About 9 large eggs equal one pound, but it's always good to use your handy dandy scale to help measure.


Mix your eggs and butter/sugar until smooth.  Now it's time to add the fun things!  Throw in the nutmeg, brandy, and lemon zest, and mix.  I left out the lemon zest this time because of the inclusion of candied lemon peel.  It's definitely cook's choice.  Also, sometimes you realize that your bowl is too small in the middle of baking.  Introducing great green bowl!


Measure out a pound of flour and mix in.  The batter will stiffen considerably and become more like the cake batter you know and love.


Finish the cake off by stirring in the candied lemon and orange peel and currants.


I find that stirring this in works the best, since the hand mixer can be a little harsh.  I just used a rubber spatula.


Pour the batter into two greased 8-inch cake pans and bake for about an hour, or until a toothpick comes out of the center clean.


Allow to cool on the counter completely, then remove from pans.  If you'd like an extra kick of flavor, I recommend soaking the cakes in brandy for anywhere between a week and a month.  To do this, simply soak a paper towel with brandy and lay them on the cakes within a plastic bag.  Replace the paper towel every couple of days.  The brandy helps to keep the cake moist and to develop the flavors of the fruit, so it is definitely enjoyable.

Delicious finished cakes waiting for a brandy bath!

When I was doing my research for these cakes, I desperately wanted to find evidence of using marzipan as an "icing", but unfortunately I did not find any examples of this.  Most of the icings that I found from this period were actually whipper meringues that were then hardened onto the cake using either a salamander or simply proximity to the fire. Henderson has one example of a recipe here:


The first recipe is the one I took inspiration from, but since meringue is so finicky I decided to use a recipe that I have used for years now.  I now realize that the second recipe in the image would have yielded a similar taste to marzipan, but oh well!  The meringue icing is the perfect touch for this cake.

Meringue icing

2 egg whites
1/4 tsp cream of tartar
Pinch of salt
1/2 cup white sugar

Preheat oven to 225.  Beat the egg whites until foamy.  Add cream of tartar, salt, and sugar, and beat until stiff peaks form.  Place cakes on parchment paper on baking sheets.  Spread a thin layer on cakes and bake for 1 hour.  Leave cakes to cool in oven with door slightly ajar.


This cake is so delicious that it can't even be classified as fruitcake.  It has none of the flavors that you would typically associate with Granny's fruitcake, and the density of fruit isn't so high that you wonder if there is even cake.  The nutmeg and lemon work perfectly together, and the brandy helps to merge the flavors.  All in all, I would highly, highly recommend it!


The Challenge: #14: Fear Factor


The Recipe: See above!


The Date/Year and Region: Europe/America, early 19th century


How Did You Make It: See above, again


Time to Complete: It takes about 30 minutes to get the batter together, and another hour to bake.  The meringue takes 15 minutes to make an an hour to bake, as well.


Total Cost: The fruit was the most expensive, topping in at $10 per batch of cake.  The other items were mostly lying around.  I would guess that two brandy-soaked meringued cakes cost about $20.


How Successful Was It?: This cake is amazing.  It's the perfect density with the fruit in the heavy pound cake base.  The meringue icing and brandy soak are really awesome additions to an already great cake!


How Accurate Is It?: Somewhat diverged from the original recipes, but in relatively accurate fashions.  Cream of tartar wasn't available in the period, and the currant question (whether fresh currants or dried "currants" [actually raisins] were meant is a conundrum) is always on my mind, though I don't think they would have called for preserved fruits (candied lemon and orange peel) to be mixed with fresh in the same cake.  I would guess that it is about 90% accurate to the period

Tuesday, December 16, 2014

Catching Up A Bit....

Well, life got a little busy and a little hairy and I haven't been able to highlight some of our participants in the past few weeks. But that doesn't mean I haven't kept up with what they've been up to! Here are a few highlights:

My Patchwork Katt made a mincemeat coffee cake, for "If They'd Had It" - looks pretty good to me:


Meanwhile, for ethnic foods, Kim of Turnspit and Table made some really beautiful French pommes et poires tapées for the ethnic foodways challenge. Her research anddocumentation is always so meticulous!


When asked to make a food named after someone, Elizabeth of Beth's Bobbin's (also a real-life friend!) made Victoria sandwiches:


...while Maren of Maren's Hus made Andrew's Gingerbread. Both treats look utterly delightful!


And when it came time for Fear Factor, Elizabeth of Elizabeth's Costumes and Crafts faced down a fearsome foe:


Jeanette and Patrcik of Mid-Century Meals earned a great deal of street cred for tackling tongue, along with some lovely stories (and a comparison of their reactions to eating tongue. I'm with you, Patrick. City kids stick together.)


Next up is Sacred and Profane, where we make our nicest and naughtiest dishes! I can't wait to see what you all make!

Saturday, December 13, 2014

Betsy Challenge 14: Fear Factor

It may sound silly, but I'm afraid of gelatins.

Okay, it is silly. I come from the Upper Midwest - the land of Jell-O salads. No family dinner is complete without Jell-O, preferably with fruit in it. Pears go in red or green Jell-O, mandarin oranges in orange Jell-O. It's a ritual here.

So, why should I be afraid of historic gelatins? I'm just afraid of them not setting up. It's a chemical process, and chemical processes scare me in general. But I've learned to be fearless, so I decided to make some sort of jelly.

I had plenty of resources and recipes - calves feet jellies, aspics, wine jellies. You'll be relieved to know that I avoided Eliza Leslie (for once) and went with Eliza Acton's Modern Cookery.

Acton goes on to note that this is technically NOT a blanc-mange, since it's not white. It's in the family of cream jellies, more of a Bavarian cream or "un Fromage Baravoise. Either way, this looked like a winner - it already says it's extremely good!

The Challenge: Fear Factor

The Recipe: Extremely Good Strawberry Blanc-Mange from Eliza Acton's Modern Cookery  (found on Google Books)

The Year/Date and Region: 1868, England

How Did You Make It: As always, I halved the recipe. First, I mascerated the strawberries with some sugar and let them sit to get juicy. After a couple hours I came back and mashed them through a sieve. After struggling to find the right tool for this (potato masher? meat tenderizer? wooden spoon?) I used the bottom of a glass jar. Necessity is the mother of invention, right?


Now, I have to come clean. I semi-cheated. The recipe calls for isinglass, and try as I might, I couldn't find any brewing supply store in the area to buy isinglass. I did not want to mess with carrageenan, which was also used in the 1860s to jellify things. The only other period option I was left with was boiling calves' feet to extract the gelatin, and I didn't think my neighbors in my apartment building would appreciate it. So, I went with powdered unflavored gelatin. Despite the fact that it wasn't available in the 1860s, and wasn't called for in the recipe, it's still similar chemically to the gelatin from calves' feet.

Anyway, where was I? Gelatin. Mixing gelatin with milk makes it look pretty gross.


But, mixing it in with the strawberries was SO pretty.


I poured the mixture into some little copper molds and put them in the fridge to set up overnight. When I woke up in the morning, they were all set! VICTORY! I dipped one in hot water and turned it out onto a plate. So very, very pretty. It was very firm (I may have overdone it with the gelatin in my nervousness).


Time to Complete: Less than half an hour, plus overnight to set and the time the berries spent sitting in sugar.

Total Cost: I didn't really keep good track of this. More than $5, less than $10.

How Successful Was It?: VERY. Imagine strawberries and cream, but in gelatin form. I taste-tested it on two people: my boss, who enjoyed it very much, and the Gentleman Friend, who also enjoyed it greatly. It was...dare I say it? Extremely good. (Sorry, couldn't resist.)

How Accurate Is It?: We've already talked about the gelatin, and the strawberries were not heirloom. I do want to try this again with isinglass, so I can judge the difference.

Saturday, November 29, 2014

Betsy Challenge 13: Ethnic Foods

Ethnic foods and their place in the Upper Midwest have always been a fascination for me - in fact, you could probably create a tangled web to show how my interest in ethnic foods led to me creating the Historical Food Fortnightly. Minnesota and Wisconsin are a stereotypical melting pots of European immigrants from all over, pockets of Polish, German, Bohemian, Slavic, and Scandinavian immigrants. These ethnic groups were very distinctive in the mid- to late-19th century, and their foodways contributed to the culinary make-up of the Upper Midwest. This is evident at every church basement potluck or family holiday dinner, with lefse, lutefisk, krumkake, abelskiver and hot potato salads.

In 2010 I attended a conference at Old World Wisconsin. If you haven't ever been, and you live within five hours, I am not being facetious when I say that you must go. It's one of my favorite sites in the Midwest, with over 60 original buildings and acres and acres of gardens, all arranged according to the ethnic groups found in Wisconsin in the 19th century. There is a Norwegian area, a German area, a Polish area, and so on. The interpreters there harvest food straight from these gardens (which have been well-researched and documented) and prepare them according to the ethnic foodways of that area. For historical foodies, it's like Disneyland.

One of the sessions at the conference was, naturally, about foodways, presented by the director of foodways at Old World Wisconsin. I went home with a packet of well-researched and well-documented recipes from their files. I knew that when it came to ethnic foodways, I could trust this treasure trove, and there was one particular recipe I wanted to try out.

The Challenge: Ethnic Foods

The Recipe: Creamed bratwurst, from the recipe files at Old World Wisconsin

The Date/Year and Region: mid- to late-19th century. The recipe itself is Pomeranian (northern Germany/Poland, pre-unification), documented to Wisconsin.

How Did You Make It: It was a very simple recipe: brown sliced bratwurst in a pan, then add cream. Cook together until the bratwurst is cooked through. I used locally butchered, uncooked bratwurst (this is Minnesota, people - we take our brats serious). I took the liberty of adding some black pepper for seasoning. As recommended by the recipe, I served it with some mashed potatoes.

Time to Complete: Half an hour, max.

Total Cost: About $6.50, and would serve about three.

How Successful Was It?: Delicious! It was like bratwurst's answer to Swedish meatballs - the sausage was flavorful and added to the cream gravy. The cream was a little thin, and in the future I might add a roux to make it a little thicker, but it certainly wasn't bad. With the potatoes, it was delicious, even if it doesn't necessarily look appetizing.

How Accurate Was It?: As always, I used an electric stove, and I did not use heritage ingredients. I don't usually rely on others' research for my recipes, but I feel very confident using the recipes from Old World Wisconsin.

Pictures!


Saturday, November 15, 2014

Betsy Challenge 12: If They'd Had It

I had no plans for this particular challenge, and I was starting to get a little nervous. That's when I stumbled on this recipe from, you guessed it, Directions for Cookery:

(I swear, I'm giving Miss Leslie a rest after this)

Fruit leather from the 1840s! Make sense - if you have a lot of fruit, dehydrating it is an easy way to preserve it for later. Leathers can even be reconstituted. Fruit leather it is!

 The Challenge: If They Had It

The Recipe: Peach leather from Directions for Cookery by Eliza Leslie

The Date/Year and Region: 1840, United States

How Did You Make It: Fresh peaches are a bit hard to find in Minnesota in November, so I went with apples. I also had to decide how to handle the "leave it in the sun" bit - even if I wanted to risk leaving fruit in the sun (and the potential for attracting winged insects), there isn't enough sunlight to do it at this time of year, and we got hit with a really gigantic snowstorm this past week. I could have used a dehydrator, but that would make it more modern than I'm comfortable with. In the end, I decided to cook it in an oven on the lowest temperature possible (170, in my oven). I pared and chopped the apples, cooked them down with a little bit of water, added some sugar, and macerated the fruit with a potato masher. Spread out on two cookie sheets, it took about 8 hours.

Time To Complete: All flippin' day.

Total Cost: About $5 for the apples.

How Successful Was It?: Part of the center of the sheet of leather didn't get done, but the rest turned out well! Like a big, chewable, apple-flavored Fruit Roll-up

How Accurate Is It?: The apples are not an heirloom variety, and I obviously had to put them in an electric oven.


Saturday, November 1, 2014

Betsy Challenge 11: Foods Named After People

Last weekend I went to my parents' house to spend the weekend with them and celebrate both my birthday and my mom's birthday. While I was there, I thought it would be fun to do a challenge with my mom (hi Mom!). I took over her kitchen on Saturday and made Franklin cakes.

I have no idea what connection these cakes have to Benjamin Franklin, or if there even is a connection, but this has been a recipe I've wanted to try for a while. I have seen it before, and I remember being intimidated by it - probably because of the queen cake pans and converting the amount of eggs. I take it as a sign of good things that I was able to research queen cake pans, decided that muffin tins would suffice, and simply winged it on the eggs. My fear of cooking is abating, thanks to HFF!

The Challenge: Foods Named After People

The Recipe: Franklin Cakes, Directions for Cookery by Eliza Leslie (anyone else tired of me and my love affair with Mrs. Leslie?


The Date/Year and Region: 1840, United States

How Did You Make It?: I followed the directions. Har har. It really wasn't all that complex. The hardest part was using a different oven and discovering that the "warm" setting on my mom's glass-top stove should really be the "do absolutely nothing for butter and molasses" setting. I did not half the recipe as I usually do, but I only used four eggs and one large lemon instead of two. I baked at 350 for about 25 minutes.

Time to Complete: A couple hours, including a "holy heck we need more molasses than that" grocery store run and the aforementioned debacle with the warm setting

Total Cost: I'm the worst at guessing this. There were a lot of spices so I'm going to say it was more than $5 but less than $10?

How Did It Turn Out: They were good! Like little gingerbread cakes. They were quite dense, so one cake was plenty for one person. They got good reviews from the family. I personally would plan to monkey a bit with the seasonings - it was missing a little something. I think there was also either too much or too little lemon in it. For a non-historic treat, they were really good with some cream cheese frosting.

How Accurate Is It?: I did not use queen cake pans and went for modern muffin tins. Next time I would like to try some patty pans. Also modern oven, stove, etc etc

Pictures!
Butter melting in molasses is funky-looking.

The finished product! They were very pretty.

Mr. Toby helped with supervision and begging. He may have gotten a bit of Franklin cake for his efforts.


Sunday, October 26, 2014

Wrapping up Challenge 10

Challenge 10 was all about cakes! As always, our participants impressed me with their interpretation of cakes - and the idea of cake has changed throughout history, so there was plenty of scope for the imagination!

First up for some honors is Gail of Art, Beauty, and Well-Ordered Chaos for her chocolate cake from 1877. I love a good chocolate cake (it's no secret I'm a bit of a choco-holic) and this one looks delicious. Well done, Gail!


Next up is Marion, who blogs from across the Atlantic at Green Martha's Kitchen. She made a gonglof (I'm just smiling and nodding here) from a recipe found in La Mode Illustree from 1898. It turned out just so pretty, and I can practically taste it melting in my mouth. Thanks, Marion!


Up Next: Foods Named After People! We're actually halfway through this challenge. This can be food named after someone in particular, like Peach Melba (named after the opera singer Nellie Melba). Or, it could be a food that simply have a moniker attached to it, like a charlotte cake. As always, the sky is the limit!

Friday, October 17, 2014

Betsy Challenge 10: Pumpkin Hoe Cakes

As with every single challenge, I started this one with very good intentions. The challenge was just in time for an immersion event I was doing; making cakes in an 1820s log cabin would be the thing to take my Historical Food Fortnightly participation to the next level!

Well, it didn't happen. I found a cabin-worthy cake, but was so busy having an excellent time (and slumming it as a tavern maid) that I didn't get a chance to make the cakes.

When I got home (after some adventures too tedious to mention here) I decided to make the things I'd been planning on making anyway - pumpkin hoe cakes, from the Kentucky Housewife. Hoe cakes are a kind of fried cornmeal cake indigenous to the southern United States. I picked this recipe because it was simple and fast. It was also dated to the time in which our cabin was first built and occupied, and a similar location (our cabin having come from Tennessee) and it was very appealing to cook the same food that might have been cooked in the cabin when it was first occupied. It was also very seasonal - 'tis the season for pumpkin, after all.


The Challenge: Let Them Eat Cake!

The Recipe: Pumpkin Hoe Cakes, from The Kentucky Housewife by Lettice Bryan

The Date/Region: 1835/Kentucky

How Did You Make It: The recipe calls for 1 quart of cornmeal, and 1 pint of pumpkin. You mix this together, with enough milk to make a thin dough, and fry it on a griddle greased with lard or butter until browned. Serve hot with butter.

I surprisingly know a thing or two about working with cornmeal, and one of the things I know is that corn has no gluten. Cooks in the 19th century often used cornmeal in exactly the same ways as they would use wheat flour, but  corn's lack of gluten makes cornmeal a very different creature.

When working with cornmeal, it is helpful to use hot (boiling) water and let it sit for about 20 minutes before working with it. This gives the best taste and makes the cornmeal more malleable (and less likely to crumble into bits, which was my big concern). So, despite there being no mention of this technique in the original recipe, I heated up the milk to scald it, mixed it in with the cornmeal until it was just moistened, and let it sit a spell.

After it sat, I mixed in the pumpkin. The texture was good, so I dropped it by very heaped tablespoons into the pan to fry. It took about 4 or 5 minutes on each side to fry up, and it was hard to tell when it was browned. A couple did fall apart, but most stuck together - victory!

Time to Complete: About a quarter of an hour from start to finish.

Total Cost: Under $5. I randomly have a superfluity of cornmeal, and a small can of pumpkin was less than $1

How Successful Was It: I was surprised at how much I liked them. They're good in the way that anything browned in butter, and then spread with more butter, is going to be good. They remind me a great deal of fried cornmeal mush (unsurprisingly) or cornmeal fritters. However, they are rather bland. I could see serving them with any mid-19th century condiment - apple butter, fruit preserves, honey, sorghum, molasses, maple syrup, or even spread with brown sugar. I ate them on the side of some carrot soup, which made for a very orange dinner, but they went together surprisingly well.

How Accurate Is It: Besides my liberties with the cornmeal and the milk, I used a can of pumpkin instead of stewing my own heirloom variety, and I am sure the corn is not heirloom either. Modern stove, etc etc etc.


They aren't very photogenic...

Monday, October 6, 2014

Wrapping up #9

Challenge 9 has come and gone! For those keeping track, the Historical Food Fortnightly has 26 challenges (52 weeks in the year means 26 fortnights) so we are just over one-third of the way to the end point!

Challenge 9 was all about frugality - ways to save money, ingredients, time, effort, and more. As always, I'm impressed by the creativity of our challengers, who came up with some really thoughtful ways of interpreting this challenge. I've also been surprised at just how many people are choosing 20th century recipes, so we're featuring two of them this fortnight!

First up is Elizabeth from The Cup That Cheers, with her interpretation of shrimp curry. She substituted trout for shrimp for allergy reasons (staying out of the ER is definitely frugal) and utilized ingredients found in the pantry. Saving time shopping and using what's on hand is definitely a "frugal housewife" move. Well done, Elizabeth!


Next is June of Food History. June is a relative newcomer to the Historical Food Fortnightly. There's no such thing as "too late" around here - we encourage people to jump in and participate as much as they are able, whenever they are able! June's first post about victory bread was a great first post with excellent research. Way to go, June!


Next Up: Let Them Eat Cake. The term "cake" has had different meanings throughout history, so as long as it's called a cake, it's free game. Small cakes, big cakes, fancy cakes, simple cakes, iced cakes, spiced cakes, fluffy cakes, dense cakes - can't wait to see what you all come up with!

Thursday, October 2, 2014

Betsy - Challenge 9: The Frugal Housewife

When I think of frugality, I (of course) think of saving money. However, a couple other principles come to mind: being able to create a tasty and attractive dish, being able to do it cheaply, and being able to utilize any ingredients on hand. My mom is a very frugal housewife in all these respects - her grandmother (my great-grandmother) once told her, "A good cook is someone who can take any ingredients she has on hand and make a meal." She's lived that principle through raising four kids, and now that I am on my own, I try to embody that principle in my cooking.

So I decided to try for a dish that used just a few ingredients one might have readily on hand, would make a dish that could be served proudly at any dinner table, and could be made inexpensively.

I turned to one of my favorite quirky cookbooks from any era, What Shall We Have For Dinner by Lady Maria Clutterbuck*. The book is a collection of bills of fare from the Lady Maria, whose late husband was of a strong appetite that required varying menus. These menus vary from the plainest tables to the fanciest dinner parties. No matter the occasion, Lady Maria has a bill of fare with a wide variety of dishes to suit.

At the end, she includes an appendix of recipes, and one of them is "Potato Balls":

Mmmm. Grated tongue.
Pretty simple, could easily be made with ingredients around the house, and can be dressed up or down depending on the occasion/diners. It's also a great way to use up leftovers - have some baked potatoes from yesterday's dinner? I think this is a very frugal recipe indeed!

*Lady Maria Clutterbuck is the pseudonym of Catherine Dickens, wife of Charles Dickens. He was very much alive at the time the book was written. She herself was a talented writer, and the book was popular enough to go through several printings.

The Challenge:  The Frugal Housewife

The Recipe: "Potato Balls" from What Shall We Have for Dinner? by Lady Maria Clutterbuck (Catherine Dickens)

The Date/Year and Region: 1852, England

How Did You Make It?: Just like it says! I baked some potatoes, let them cool a bit, and then peeled off the skins. I mashed them (adding some salt and pepper), and formed them into balls about the size of a golf ball. I brushed those with egg yolk - the yolk from the egg I grabbed was kind of thick, so it ended up a little gloppy, and the fact that I did not have a pastry brush on hand didn't help. I popped them in a 450 degree oven for about ten minutes to brown.

Time to Complete: I baked the potatoes for an hour, it took about 20 minutes to cool, peel and mash, then another ten to bake. Obviously most of that time was cook time, rather than prep time.

Total Cost: $2 max. I used four medium-ish potatoes and got a dozen balls.

How Successful Was It?: Not bad! They're a little bit like a rissole, but baked (thus healthier). It reminded me a lot of a twice-baked potato, minus the skins and all the fixings. The egg yolk was definitely too thick, but that's easily remedied next time. They could definitely be dressed up with a sauce, or with a garnish, to make them a little fancier, but they were a nice accompaniment to tonight's soup dinner.

How Accurate Was It?: No heirloom potatoes (just plain old russets) and cooked in an electric oven (as always) but besides that, very accurate.


Tuesday, September 23, 2014

Wrapping Up Challenge 7 and 8

So I seem to be on a kick where I do these posts every other challenge. Life (mostly work) is just that crazy lately. I hope to able to get back to a more consistent swing of things soon!

For Challenge 7, we had a lot of folks making innovative, improved foods from history. Apparently that meant a lot of gelatin! Elin at The Sloppy Cook is one of our European participants, and she has such enthusiasm and a great sense of humor; I always love reading her blog entries and seeing her latest creations. She gave us a brief history of gelatin in her quest to recreate a Nougat Pudding from 1911. It's...well, the presentation might not be so hot, but the recipe sounds delicious! Well done, Elin!

Well that's...interesting.


For Challenge 8, our participants made jams, jellies and preserves. Kim of Turnspit & Table (from Australia! We're very international!) made an incredibly pretty orange marmalade. I'm always impressed with Kim's meticulous research, and this challenge is no exception. Seriously, just look at that picture and try not to drool. Way to go, Kim!


Next Up - The Frugal Housewife! Frugality is a trait that was prized across cultures and centuries, especially in the preparation of food. So let's see how frugal you can be! There are lots of different kinds of frugality - frugality in time, frugality in space, frugality in money. Can't wait to see what you all come up with!

Saturday, September 20, 2014

Betsy Challenge 8: East India Pickle

I have never really enjoyed the process of making jams or jellies. There were a couple autumns I went to town on my parents' crab apple tree and made crab apple jelly, but that lost its appeal quickly. So I knew I wasn't going to do a traditional fruit preserve for this challenge, and instead decided something I'd never done before - pickling.

I am generally too anxious for canning, so I knew I wanted to try one of those old pickle recipes that you can keep in the fridge and keep adding to, rather than sealing it up and storing it away. I also wanted a pickle recipe that didn't have to sit for weeks on end - I wanted quick results. And, straight vinegar is not my favorite scent, so I didn't want to have to cook a whole bunch of vinegar either. I know, I have a lot of requirements for pickles.

Enter the recipe for East India Pickle from our old pal Eliza Leslie, in her Directions for Cookery. Normally I would put up a screenshot of the recipe, but it's spread out over a few pages, so I'll just direct you to page 227. No cooking of vinegar? Check! Pickles ready within a month? Check! She even says that you can keep adding to the pickle, though I will caution you that I highly doubt her "go ahead and keep it for two years" directive - I'm going to figure on these being similar to refrigerator pickles with a shelf life of about three months.

The Challenge: In a Jam (or Jelly, or Preserve)

The Recipe: East India Pickle, from Directions for Cookery

The Date, Region: 1844, American (Philadelphia); a similar recipe with the same name exists in the White House Cookbook from the 1880s

How Did You Make It: First I created the vinegar pickle well ahead of time. I used white vinegar, mustard seeds, shallots, garlic, turmeric and ginger. I could not find long pepper besides ordering it online, so I used black peppercorns instead. This time I doubled the recipe, put it all into a gallon jug, and let it sit in a sunny place (the best I can get to "a warm place") for ten days.

Next, I processed the vegetables. I cut up a head of cauliflower, three bell peppers, three medium-sized carrots, a handful of pearl onions, a whole bunch of green beans and two small cucumbers. I threw in a handful of green grapes, because I had them on hand and I was intrigued by the idea. I put them in a brine and set them in a fridge for a week. (Do note that I let the vinegar and the veggies sit longer than Mrs. Leslie directs - life got busy.)

I took the vegetables out, drained them, and rinsed them with more vinegar. I divided them up into jars. For someone who has real difficulty with spatial reasoning, I actually had the perfect amout of vegetables to fit twelve pint jars. I then strained the vinegar over the vegetables. I was honestly surprised by how good it smelled - I'm not a huge fan of turmeric, but I smelled the mustard, garlic and ginger more than anything. I put the covers on, and stuck them in the fridge.

Time to Complete: Ten days for it all to sit. Processing the vegetables probably took an hour (thank you, mandolin slicer), prepping the vinegar took half an hour (mostly peeling/slicing shallots, garlic and ginger). Canning took about half an hour.

Total Cost: 'SPEEEENSIVE. I ended up with 12 pints of pickles, but the cost for all the spices and some of the more expensive ingredients like the pearl onions and the shallots, plus the cost of the jars, really added up.

How Successful Was It? TBD! I'm going to let them sit for a while before I taste test, obviously. They look and smell good, so I have high hopes?

How Accurate Is It? As usual, I did not have access to heirloom varieties. I also used white vinegar, because I like it better than cider vinegar, but cider vinegar may be more accurate and it would be worth trying with other kinds of vinegar to see the tastes. As mentioned, I also had issues finding long peppers.

Pictures!

The vinegar...look at all the mustard seed at the bottom!


Draining the veggies after soaking in brine

Veggies, ready to be vinegarized!

The finished product